Can a homemade version really match the tangy, creamy hit you crave from the restaurant? I set out to recreate that southwest-inspired sauce so you can enjoy it at home without specialty items. My copycat aims for quick prep, pantry spices, and a smooth texture that works as both a dip and a dressing.
I explain how simple ingredients—buttermilk, ripe avocado, cilantro, spices, and fresh lime—combine for that signature bite. I also share why chilling matters: resting the mix makes the texture thicker and the flavors meld into something close to the restaurant version.
Expect clear steps, smart swaps, and troubleshooting so this homemade copycat of chick fil a avocado lime ranch dressing comes out reliable every time, even if you tweak amounts to suit your taste.
Key Takeaways
- Quick, pantry-friendly recipe that doubles as dip and dressing.
- Primary flavors: creamy avocado, bright lime, and classic herbs.
- Blending and chilling are both essential for ideal texture.
- Simple swaps let you match heat and tang to your preference.
- Step-by-step tips help the final result taste close to the restaurant.
Why I Love This Avocado Lime Ranch (and Why It Tastes Like the Restaurant Version)
The reason I keep making this at home is its balance: silky richness, fresh brightness, and bold seasoning. That combo gives the sauce its southwest personality and keeps it from tasting flat.
Southwest-style ranch vibe: creamy base + tangy citrus
I lean into a creamy base bolstered by citrus and cilantro to get that southwest vibe. The contrast between rich and bright creates the signature flavor people crave.
Homemade perks: fresh herbs and easy tweaks
Making this myself means fresher herbs and control over salt, heat, and sweetness. I can boost garlic or dial back tang until it suits my taste.
Versatile use: salad topper, dipping sauce, or sandwich spread
Its real win is versatility. I spoon it over a green salad, use it as a dipping sauce for fries, or spread it inside wraps. Texture matters too—thick enough to cling, not runny.
Copycat chick fil a avocado lime ranch dressing: What to Expect
You’ll notice zesty top notes, midlevel herb flavor, and a smooth, rich close on the palate. I mean bright citrus up front, classic ranch herbs next, and creamy richness at the finish. This helps you taste-test as you go.
Flavor profile: zesty, herby, and rich
I define the target plainly: zesty lime first, savory herbs in the middle, and a buttery avocado finish. If it tastes sharp after blending, don’t worry—rest will soften it.
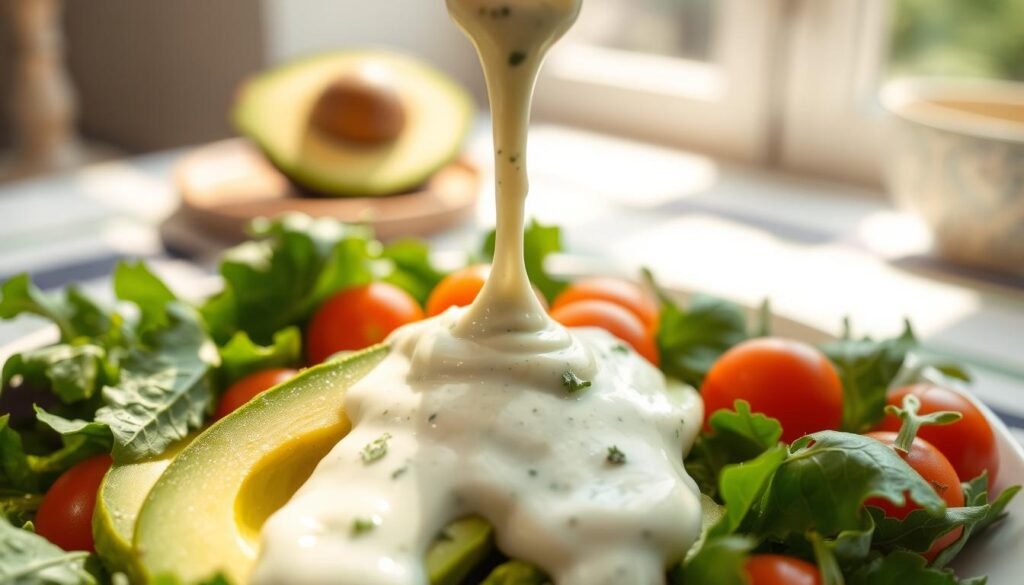
Texture goals: smooth, creamy, and spoonable (not watery)
Smoothness is key. I use a blender or food processor to remove graininess and to distribute dried seasonings evenly. Aim for a spoonable consistency that clings to greens and chips.
Best make-ahead window: chilling time to help flavors meld
Make time for chilling. Refrigerate at least 30–60 minutes, or longer for best results. Cold rest thickens the sauce and rounds the sharp edges, making it feel closer to restaurant style.
- Adjust brightness with more lime or salt for pop.
- Add a splash of dairy to thin, or extra avocado for richness.
- Use common pantry items—no packet required.
Ingredients I Use for the Creamiest Avocado Lime Ranch
My ingredient choices focus on texture and balance, so every spoonful tastes rounded and fresh. Below I list what I use and why each part matters for that smooth, bright finish.
Core dairy base
Buttermilk, sour cream, and mayonnaise form the backbone. Buttermilk adds tang and thinning power. I use 1/2 cup sour cream for body and 1/4 cup mayo for richness. These ingredients keep the texture creamy and stable.
Fruit and citrus
I pick one ripe fruit with a slight give—soft but not mushy—for the best mouthfeel. For brightness I add 2 tablespoons fresh lime juice and sometimes a little zest to boost aroma without extra acidity.
Seasonings that create the classic profile
The spice mix is simple: 1 1/2 teaspoons dried dill, 1/2 teaspoon garlic powder, 1/2 teaspoon cumin, 1/2 teaspoon salt, and 1/4 teaspoon black pepper. Each spice layers into the savory profile I aim for.
Optional boosters and fresh herbs
- Tested boosters: splash of apple cider vinegar or Worcestershire, a tiny pinch of sugar to round edges.
- Cilantro: blend 2 tablespoons in for herbal depth or use as a garnish for a milder result.
- Variations: some recipes call for oil or lime zest to tweak texture and aroma.
Measure carefully—use teaspoon and tablespoons amounts listed above for repeatable results. The ingredient list is simple, but the tool you use will decide how smooth the final sauce becomes.
Tools That Make This Recipe Fast (Food Processor or Blender)

Choosing the right appliance makes the texture reliably smooth and spoonable. The gear you pick changes how creamy and lump-free the mix turns out.
Food processor vs. blender: what I use for the smoothest texture
I use a blender when I want a very silky result fast. Blending on low prevents splatter and gives a fine puree.
For thicker batches or when I need to scrape down sides, the food processor wins. The processor handles dense, chunky mixes with less fuss.
Measuring basics: tablespoon, teaspoon, cup for consistent results
Accuracy matters. I measure spices with a teaspoon and tablespoon, and liquids with a standard cup measure. Small shifts in seasoning show up quickly, so I follow these tools for repeatable results.
Best container for chilling: wide-mouth jar or other airtight container
I store the sauce in an airtight container to protect flavor and slow browning. A 16-ounce wide-mouth mason jar fits well and makes transferring easy.
“Chilling in the same container I’ll store it in saves time and reduces mess.”
- Blend on low until fully combined, then scrape and finish if needed.
- Use your cup and tablespoon measures to keep seasoning steady.
- Chill in a sealed container so the food keeps fresh and odors don’t transfer.
How I Make It in Minutes
I keep this recipe focused on speed and reliable texture. With a clear prep order and short blending bursts, the whole process takes only a few minutes of hands-on time before chilling.
Prep: choose and cut ripe avocado safely
I pick a fruit that yields slightly to gentle pressure. To cut it, score around the circumference, twist the halves apart, and tap the pit with a knife to remove it safely. Scoop the flesh with a spoon into the blender bowl.
Blend: add ingredients and process on low
I add the wet base first, then fruit and seasonings. I pulse on low so the mix becomes smooth instead of clumpy. I stop to scrape the sides once or twice for an even texture.
Taste test and chill
I taste for lime and salt, and tweak herbs for the flavor I want. If I want a thicker dip-like sauce, I add more fruit; for a pourable dressing, I thin with buttermilk.
Final step: refrigerate at least 30–60 minutes so the flavors meld before serving.
Tips for Perfect Flavor and Texture Every Time

A few simple checks—ripeness, salt, and rest—save time and improve texture. I run through these steps before I serve anything, which keeps the final flavor steady from batch to batch.
Avocado ripeness: how I avoid grainy or bland results
I check the fruit by gentle squeeze: slightly soft but not mushy. Firm fruit blends into grainy lumps, while overripe fruit can taste dull or off.
If the fruit is borderline, I let it sit at room temperature a few hours. That short time makes a big difference in smoothness and overall texture.
Lime juice balance: adding brightness without overpowering
I add juice in small increments and taste between additions. Brightness should lift the flavor without turning the whole mix sour.
If it goes too bright, I mellow it with a spoon of mayo—the extra fat smooths the acidity. You can also add a tiny pinch of sugar to round the edges.
How chilling thickens and improves overall flavor
Chill for at least 30–60 minutes. Resting helps the herbs and spices meld, and the sauce firms up slightly so the texture clings better to greens and chips.
Fixes for common issues
- Too thick: thin with a splash of buttermilk or milk—add slowly and test for time-sensitive thinning.
- Too thin: add more fruit or a tablespoon of sour cream to increase body.
- Too tangy: soften with a bit more mayo (adds fat and richness) or a pinch of sugar.
- Too salty: dilute with extra dairy base or fruit, then re-balance herbs and citrus.
Taste, chill, taste again. I always sample after resting because the true flavor and texture reveal themselves with a little time.
Ingredient Substitutions I Recommend (and What I Don’t)
I prefer substitutions that mimic mouthfeel before matching exact flavor notes. When I swap, I aim to keep the sauce creamy, herby, and bright.
Buttermilk substitute
My go-to: milk plus a small splash of vinegar or lemon juice, then rest for five minutes so it thickens. This mimics buttermilk’s tang and thins the mix when needed.
Greek yogurt or sour cream?
I use greek yogurt if I want a tangier, thicker result. It makes the final ranch more spoonable.
If you prefer a milder finish, stick with sour cream for a smoother, less tart outcome.
Why I keep the mayo
I don’t recommend swapping out mayonnaise. It adds fat and smooths sharp edges from juice and vinegar. That balance is key to the creamy finish I expect.
Fresh vs. dried herbs
Use this rule: 1 teaspoon dried ≈ 1 tablespoon fresh. For cilantro, 2 teaspoons dried works for about 2 tablespoons fresh.
- More fresh herbs shorten shelf life, so plan make-ahead timing.
- Small changes keep the overall flavor profile — creamy, herby, tangy — intact.
How I Serve Avocado Lime Ranch
I use this mix to tie together taco bowls, snack platters, and quick weeknight wraps.
As a salad dressing: For simple greens I thin the blend slightly so it pours. For taco-style salad bowls I keep it thicker so it clings to shredded lettuce, beans, and roasted corn.
As a dipping sauce
I treat it as a party dip for tortilla chips, carrot sticks, and celery. It also pairs with fries and chicken nuggets for an easy snack. One spoonful lifts plain sides into something more interesting.
As a spread or drizzle
I spread it on wraps and sandwiches, especially with grilled or crispy chicken, to echo fast-casual flavors at home. I also drizzle it over grilled meats and burritos for a quick sauce upgrade.
- Consistency tip: thin with buttermilk to make a pourable salad dressing; add extra fruit or sour cream for dip-like body.
- Make one batch for meal prep—it covers several salads, snacks, and sandwiches during the week.
- Adjust brightness or herbs depending on the dish: more lime for tacos, more dill for green salads.
Storage, Shelf Life, and Color Changes
A simple airtight routine makes homemade sauces last longer and keeps them tasting like they did fresh. I store my batch in a 16-ounce wide-mouth mason jar because it seals well and is easy to shake or stir before serving.
Why I always use an airtight jar
Keeping the mix in an airtight container protects flavor and limits fridge odors. It also helps maintain texture so the sauce stays smooth and spoonable.
How long it lasts in the fridge
For dairy-based versions I follow a one-week rule. Freshly opened sour cream and buttermilk extend this window. If you make a preservative-free batch, plan to eat it in a few days for best quality.
Color changes and separation
Natural oxidation can darken the top slightly within 24–48 hours. That is normal. Stir or shake to recombine if separation occurs.
Food safety notes
Start with fresh dairy, keep the jar cold, and never leave it out for long. Discard the sauce if it smells off or tastes sour.
“I always taste after chilling; if it seems odd, I toss it.”
Conclusion
This final note wraps up how to make a creamy, zesty copycat sauce at home with confidence.
Key wins: use a ripe avocado, measure seasonings, blend until smooth, and chill so textures and flavors meld. Resting the mix firms it up and tames sharp edges.
For easy tweaks, add more lime juice for brightness, a pinch of sugar to round acidity, or a splash of milk to thin for salad use. I keep extra dill, garlic, and cumin on hand to adjust the herb profile.
Store the batch in an airtight jar, expect slight color change from the fruit, and use within about a week for best taste and safety. I love it on salads, for dipping, and as a wrap spread—taste, tweak, and make this recipe your own.