Curious how to get that signature fast-food taste without the drive-thru? I make a copycat version at home that keeps mornings simple and high in protein.
This sandwich is one of the lighter, satisfying breakfast choices people order when they want fuel that won’t weigh them down. My method focuses on the grilled chicken flavor from a quick pickle-juice brine and on easy egg-white prep so you can meal-prep without fuss.
In this post I set clear expectations: I share a practical recipe you can follow in a normal kitchen. I’ll cover ingredients, timing, cooking temps, assembly, and storage so you can decide if making it at home is worth it.
Quick roadmap: marinate chicken → cook eggs → grill chicken → toast muffins → assemble. I also include reheating tips that keep the chicken tender and a printable note if you want to print the steps for the week.
Key Takeaways
- You can recreate the signature flavor with a simple pickle-juice brine.
- The method favors easy prep so you can meal-prep for busy mornings.
- I explain ingredients, temps, and timing so the plan is repeatable.
- Reheat tips help keep grilled chicken tender after refrigeration or freezing.
- This recipe aims to cut the drive-thru while keeping the sandwich light and satisfying.
Why I Make This Copycat Egg White Grill Breakfast Sandwich at Home
My weekday routine includes a homemade version that stays light yet keeps me full until lunch. I make it for its high protein and simple prep. It’s macro-friendly—often 25g+ protein—so it fits days when I want fuel without heaviness.
What makes it lighter but still satisfying
Egg white and grilled chicken keep fat low while protein stays high. That combo feels less greasy than many fried options. I get lasting energy and fewer midday cravings.
My go-to strategy for skipping the drive-thru and meal prepping breakfast
I batch-cook thin chicken and set up egg white portions. Then I assemble and wrap several sandwiches for the week. For rush mornings, a quick build can take under 15 time minutes if chicken is ready.
How the homemade version compares on cost and convenience
Buying ingredients in bulk cuts per-sandwich cost—often about half the price of ordering out. The tradeoff is planning time for marinades, but the payoff is fridge-ready breakfasts and real convenience when mornings are tight.
- Quick option: pre-cooked chicken + 15 time minutes to assemble.
- Full flavor: marinate 2–8 hours for best taste.
- Meal prep win: fewer drive-thru temptations, more control over macros.
Chick fil a egg white grill Ingredients I Use (and Smart Swaps)

For this copycat build, I stick to a short ingredient list that delivers the signature balance of savory and bright. Below I list exactly what I buy and why each item matters for recreating that fast-food flavor at home.
Chicken breast and the pickle juice brine for signature flavor
What I buy: boneless, skinless chicken breast, olive oil, and pickle juice.
I keep portions thin and sandwich-sized so every bite has chicken without bulk. A quick chicken pickle juice brine adds tang and helps the meat stay tender after cooking.
Egg whites: cartons vs cracking eggs (and how I keep them fluffy)
I use store-bought egg whites for time savings and less waste. When I crack whole eggs, I separate and whisk gently to keep the texture light.
English muffin choices: multigrain, whole wheat, and other options
I prefer multigrain english muffins for fiber and whole wheat for a heartier bite. For low-carb or gluten-free needs, I swap muffins for suitable alternatives.
Cheddar cheese vs American cheese (plus my no-cheese alternative)
Cheddar cheese gives a sharper profile; American melts more uniformly. For dairy-free builds, sliced avocado makes a creamy, savory substitute.
Seasonings and brightness: onion powder, garlic powder, lemon zest, and lemon juice
My seasoning kit is simple: onion powder, garlic powder, lemon zest, and a squeeze of lemon juice. These ingredients add brightness without long prep.
“A short list of quality ingredients beats a long list of cluttered flavors.”
- Smart swaps: low-carb english muffins, avocado instead of cheese, or pre-cooked thin breast for faster mornings.
- Why it works: the combo of chicken pickle juice, onion powder, and good muffins recreates the savory-tang balance I want.
How I Prep the Chicken for Juicy Grilled Chicken Breast

I start each batch by shaping the meat so it fits the muffin and cooks evenly. First, I pound each breast to about 1/4-inch thickness. Then I cut it into four muffin-sized pieces so every sandwich gets the same portion.
Pounding and portioning for a perfect fit
I use a flat mallet and a zip-top bag to protect the meat. Thin pieces cook fast and stack neatly on the top of the muffin.
Pickle juice marinade time: quick option vs best flavor window
In a bowl I whisk pickle juice, onion powder, garlic powder, lemon zest, lemon juice, and olive oil. For best flavor I marinate 2–8 hours. If I’m rushed, a 10-minute toss still helps.
Grilling or skillet cooking: what I use at home
I cook on a grill, grill pan, or cast iron at medium-high (about 375–400°F). Cook roughly 3–4 minutes per side until edges brown and you see light char.
Target internal temperature and avoiding dry reheated meat
I pull the chicken at 165°F using an instant-read thermometer and let it rest briefly. Overcooking on day one makes reheated chicken tough, so hitting the temp and resting is my simple rule.
“Simple handling—thin, marinated, timed—keeps the meat juicy and consistent.”
How I Make the Egg Whites for the White Grill Layer
I aim for a soft, even layer that supports the chicken without weighing the sandwich down. The layer should be thin, tender, and easy to stack so mornings stay quick.
Oven-baked sheet method: I whisk 1½ cups of egg whites with a pinch of salt. I pour into an oiled 8×8 glass dish and bake at 350°F for about 20–22 minutes until the center is set but not browned.
After cooling ~5 minutes, I cut the sheet into four squares or use a ~3¾-inch cutter for rounds. Squares are fastest for meal prep; rounds feel more like the fast-food version.
Skillet method for one sandwich: I heat a nonstick pan on low and pour a thin layer of whites. I cook gently until just set, then fold in half and fold again into a neat triangle for stacking.
I season simply with salt and, if I want a hint of savory, a light sprinkle of onion powder or pepper. The goal is fluffy egg whites, not rubbery texture. Gentle heat and timely removal are the keys.
“A mild seasoning and low heat keep the layer tender and reheatable.”
- Sheet method = uniform pieces for meal prep.
- Skillet method = quick, folded pieces for single builds.
- Pull when set to keep the whites soft and easy to stack.
Assembling the Egg White Grill on a Toasted English Muffin
For the best bite now or later, I set my toaster slightly darker than usual before assembling. That extra toasting helps the muffin resist steam when I reheat in the microwave.
Toasting tips for better texture
I toast english muffins to a golden-brown edge when I plan to eat right away. For meal prep, I toast english muffins a bit more until slightly drier.
Why this works: a more toasted english muffin keeps moisture out and stays firmer after reheating.
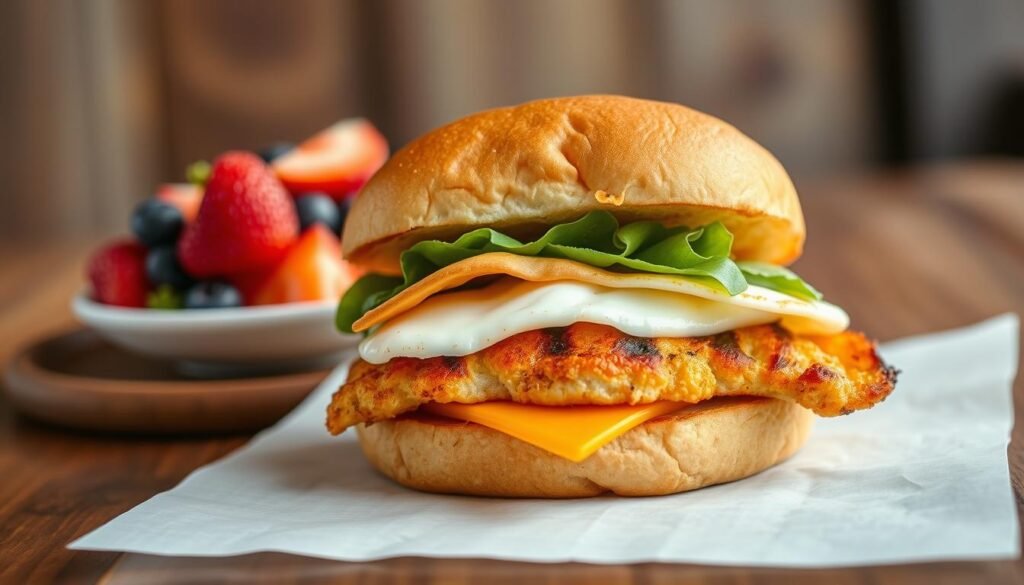
My build order
- Place the bottom half muffin on your work surface.
- Add the cooked egg layer next so it sits flat.
- Top with grilled chicken sized to the muffin.
- Add cheese, then close with the top half muffin.
I sometimes put cheese on the warm top half muffin so it softens before I press the sandwich closed. Other times I melt the cheese directly on the hot chicken for more pull.
Optional flavor boosts I like
- Sweet-savory swipe: a thin layer of strawberry jam for contrast.
- Spicy kick: a light drizzle of sriracha or hot sauce.
- Simple swaps: extra cheese, avocado, or no cheese to match preferences.
“Portion each component to muffin size so every half muffin gives a balanced bite of egg, grilled chicken, and cheese.”
Meal Prep, Storage, Freezing, and Reheating Tips
I organize my breakfasts so reheating is fast and the texture stays right. Good wrapping, realistic fridge timing, and simple reheating choices make morning prep a real convenience.
How I wrap and refrigerate sandwiches for weekday breakfasts
I wrap each sandwich in parchment first, then foil so the muffin stays firmer and steam does not sog it. I label each with the date and stack them upright. In my fridge they keep well for 3–4 days.
How I freeze breakfast sandwiches for longer storage
For freezing I wrap tightly in plastic wrap, then foil. I usually leave off cheese before freezing and add it when reheating. Frozen sandwiches last 2–3 months.
Reheating methods: microwave, oven, and air fryer
- Microwave: from fridge 45–60 seconds; frozen about 1 minute per side, flip once.
- Oven: wrapped in foil at 375°F for 12–15 minutes for crisp muffin edges.
- Air fryer: wrapped in foil at 325°F for 12–15 minutes for faster crisping.
My best tip for keeping the chicken breast tender after reheating
The key is the initial cook: stop at 165°F and rest briefly. If you overcook the chicken the first time, reheating will dry it further. For meal prep, toast muffins a touch more before assembly to protect texture when you reheat later.
“Cook to temp, wrap smart, and choose the reheating method that fits your morning time.”
Conclusion
Key takeaway: I recreate the egg white grill vibe at home by using a pickle-juice brine for tender chicken, gentle egg prep, and a well-toasted muffin for structure.
Why it works: This keeps breakfasts high in protein and lighter than fried options, so you skip the drive-thru but still satisfy cravings.
Pick your egg method: bake a sheet for meal prep or use the skillet fold for single servings. Don’t overcook the chicken, toast the muffin a touch more for reheating, and assemble in the order that holds steam out.
Customize with cheddar or American, try spicy or sweet-savory spreads, or swap cheese for avocado. Check the meal prep and storage tips so you can make a batch and eat well all week.